With everything, I needed to expand. Rebekah and I got a chest freezer from my uncle a when we first moved into our house. His neighbors were moving and they didn't need it any more. My uncle also didn't need it so that's how we ended up with it.
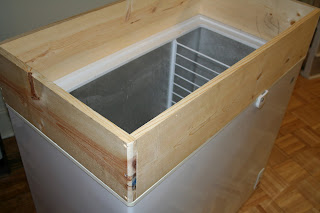
The freezer measures 36 inches by 21 inches. I decided to build a collar on top of the freeze so if we ever decided to turn it back into a deep freeze it wouldn't have holes in it. I also purchases a Johnson Controls Analog Thermostat to keep the freezer at a refreshing 40 degrees. I also noticed everyone stains the wood on their kegorator collars so I decided to go with a different look. I found some stainless steel contact paper at Menard's so that's how I'm going to finish my look. I detached the lid of the freezer and began construction of the collar.
I just used select pine board 1x8 for my collar. I used wood screws and then routed the edges to match the round edges of the freezer.
Here's the Freezer with the contact paper on the wood. It doesn't look too bad. It is a little fake, but it was a quick way to finish the project in less than a day. I also got some R6 insulation to line the inside of the wood on the freezer. I just going to use the basic set up I had on the inside of the other kegorator for now.
You can see the foam insulation on the inside of the freezer on the bottom left you can see the end of the thermostat. After a long day of work, I thought I deserved a nice pint of Pale Ale.
Prost!


No comments:
Post a Comment